Auxiliary circuit diagram for accurately measuring small resistance value of ordinary multimeter

Test - lowercase jpg

In actual work, in order to analyze the circuit principle, when drawing the electrical schematic according to the physical object, it is often necessary to measure the actual resistance of the small resistance value, such as the constant copper resistance (usually milliohms) used to detect the load current in the high-end switching power supply. Level), high-power small resistance resistor for overcurrent protection (some reach below 0.1Ω), feedback resistor in series with current amplifier tube (E or s pole) in high power amplifier circuit (generally zero ohms) . Since the minimum range of electrical blocking of a conventional digital multimeter is 200 Ω, it is often impossible to accurately measure the specific resistance of these resistors, and it is difficult to determine the consistency of these resistors, which is often difficult. To this end, try to make the auxiliary circuit shown in Figure 1, combined with the DC low voltage block (200mV, 2V, 20V) of the multimeter to achieve accurate measurement of small resistance.

Working principle: a constant current source is used to add a certain current to the measured resistance RX, and then the voltage across Rx is measured by a multimeter. The measured voltage value is divided by the constant current flowing through the measured resistance Rx to obtain the measured resistance. Resistance. Theoretically, the larger the current flowing through the resistance to be tested, the easier it is to accurately measure the resistance of the small resistance resistor Rx, but the current is too large, which will cause severe heat generation of the constant current source, affecting the stability of the current, resulting in the measured resistance. The value is not accurate; the second is that the small power resistor does not allow excessive current to flow. For this purpose, the circuit uses LM317 (U1) and resistors R1, R2 and potentiometer RP1 together to form a simple 100mA constant current source.
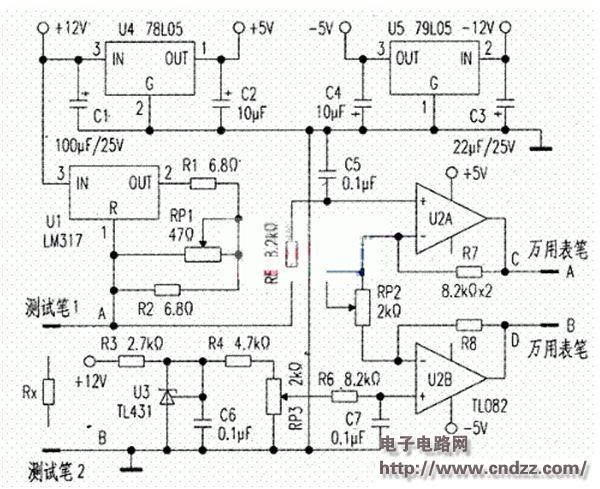
/> Figure 1: Circuit Schematic The operational amplifiers U2A and U2B and R7, R8, RP2 (precision potentiometer) constitute a voltage amplifier circuit, the voltage across the measured resistance 10 times magnification, so the voltage value measured by the digital multimeter from C and D can correspond to the resistance of the measured resistance RX (1mV corresponds to 1mΩ, 1V corresponds to 1Ω).  In order to improve the stability and accuracy of the amplifier, u4 and u5 are used to provide a symmetrical +5V working power supply for the op amp. U3 and resistor R3 form a 2.5v reference potential circuit, and apply the appropriate potential to the non-inverting terminal of the operational amplifier U2B through R4 and the precision potentiometer RP3 to cancel the current flowing through the test pen 1 and the test pen 2 lead and the contact resistance. The voltage drop. Making and commissioning: The auxiliary circuit board is soldered on a breadboard as shown in Fig. 1. Pay attention to the following points during the production process: (1) The ground wire needs to be connected to point B shown in Figure 1 to avoid the "high current" flowing through the measured resistance Rx affecting the operation of the op amp. .  (2) U4 (78L05) and u5 (79L05) should select tubes with the same output voltage value to ensure that the operating voltage of the op amp is ±5V symmetrical.  (3) Resistors R7 and R8 should be carefully selected to ensure good resistance.  (4) The circuit uses ±12V of the computer switching power supply for power supply. Therefore, the LM317 generates a large amount of heat and needs to be equipped with a suitable heat sink, which is also a defect of this circuit.  Debugging step: The first step is to adjust the constant current source current. Place the digital multimeter in a DC 200mA block. Connected in series between A and B, carefully adjust the potentiometer RP1 after power-on. Make the multimeter's reading stable at 100mA. The second step. Adjust the magnification of the amplifier circuit. First, short the two points A and B, then connect the digital meter (200mV voltage block) between the center pin of the potentiometer RP3 and the ground. After power-on, adjust the precision potentiometer RP3. Make the multimeter read 100mV, then connect the multimeter between C and D. Carefully adjust the precision potentiometer RP2 to stabilize the multimeter's reading to 1V. The third step is to adjust to zero. In the case of power failure, disconnect the short-circuit line connected between A and B in the previous step. After power-on, touch test pen 1 and test pen 2 together, carefully adjust the precision potentiometer RP3. Make the voltage between the two points c and D as 0mV as much as possible. It is difficult to adjust to 0mV in actual operation. However, it can be adjusted to 3mv-6mV, which ensures that the measured voltage accuracy is less than 10mV (corresponding to 10mΩ). Measurement and comparison: This circuit is suitable for measuring small resistances less than 8Ω. In the actual measurement, the digital multimeter (low voltage gear) is connected between C and D. After power-on, the test pen 1 and the test pen 2 are reliably contacted at both ends of the measured resistance. Reading from the multimeter (1mV corresponds to 1mΩ, .IV corresponds to 1Ω), the resistance of the measured small resistance resistor can be obtained. When measuring the resistance of a milliohm resistor (such as the constant copper resistor in a high-end switching power supply), first place the two test pens on the pad on one end of the constant copper resistor, measure and record the reading; then test the two test pens. Place the pads on both ends of the Constantar resistance separately, measure again and record the reading: then subtract the previous measured reading from the last measured reading. The resistance of the milliohm resistor can be obtained. The attached table uses the VICTOR VC9805A+ digital multimeter 200Ω gear and uses this circuit to measure the actual data of different small resistance resistors in conjunction with the multimeter low voltage file, the unit is Ω. <img width="589" height="164" src="http://i.bosscdn.com/blog/20/17/56/16243776818.jpg" alt=
Multimeter low voltage file to measure the actual data of different small resistance resistors

1000W FM Transmitter

Combining the very latest technologies with proven RF experience, our 1000W FM Transmitter has been designed to offer an innovative and highly reliable solution for medium power transmission.
The FM 1000W is highly robust and delivers efficiency of up to 72%. Top signal quality and performance are achieved thanks to the [FM band direct to frequency" Digital Modulator. It also offers several innovative features such as dynamic RDS encoding and 5 band sound processing.

1000W Fm Transmitter,1000W Fm Radio Transmitter,1000W Fm Radio Transmitter System,1000W Professional Fm Broadcast Transmitter

Anshan Yuexing Technology Electronics Co., LTD , https://www.yxhtfmtv.com